
Introduction
If you are remodeling a bathroom in Spring, TX, one of the most critical milestones in your entire project is the rough-in inspection. This single checkpoint determines whether your plumbing, electrical, framing, and mechanical systems have been installed correctly — before the walls are closed up and everything becomes inaccessible behind drywall, cement board, and tile. Homeowners planning a renovation often begin by understanding what professional expert bathroom remodel services typically include, especially when permits and inspections are involved.
Pass the rough-in inspection on the first attempt, and your project moves forward smoothly into insulation, drywall, tile, and finish work. Fail it — and you are looking at correction notices, rework costs, re-inspection fees, and potentially days or weeks of project delay before you can move forward. This is why many homeowners choose experienced teams offering bathroom remodeling services in The Woodlands or nearby communities like Conroe, Spring, Tomball, and Magnolia, where experienced contractors already understand local building codes and inspection expectations.
The good news is that rough-in inspection failures are almost entirely preventable. The vast majority of failures in Spring TX bathroom remodels come down to a small set of recurring issues: improper drain slope, missing or incorrect GFCI protection, exhaust fans venting into the attic, shower pan flood tests not completed, and structural changes that do not match the approved permit plans. Every single one of these is preventable with the right preparation.
If you are planning a bathroom renovation and want to avoid costly delays during inspections, it helps to work with a contractor who handles permits, code compliance, and inspection coordination from the start. You can contact our remodeling contractors for bathroom remodeling to discuss your project and learn how a properly planned remodel can move smoothly from rough-in inspection to final finishing without unnecessary setbacks.
What Is a Rough-In Inspection?
A rough-in inspection is a mandatory code inspection that takes place after the structural, plumbing, electrical, and mechanical systems have been installed in their final positions — but before insulation, drywall, cement board, or any wall covering is applied. The purpose is to verify that all hidden systems are correctly installed and code-compliant while they are still visible and accessible to the inspector.
This is one of the most important inspections in the entire bathroom remodel process because everything that happens afterward — substrate, tile, fixtures, finishes — builds on top of what is verified here. Mistakes discovered after walls are closed are dramatically more expensive to correct than mistakes caught at rough-in.
At the rough-in inspection stage, the inspector verifies:
- Plumbing supply lines — pipe sizing, material type, pressure integrity, and connection points
- Drain and waste lines — correct pipe sizing, proper slope, trap placement, and cleanout access
- Venting systems — correct vent sizing, tie-in locations, and stack connections
- Electrical wiring — correct wire gauge, box placement, box fill calculations, and circuit routing
- GFCI compliance — protection verified at all required bathroom locations
- Framing modifications — stud spacing, header sizing, blocking installation, and structural integrity
- Shower pan liner or membrane — waterproofing installation and 24-hour flood test results
- Mechanical ventilation — exhaust fan wiring, duct routing, and exterior termination
- Code compliance for fixture spacing, safety clearances, and structural requirements
Once the rough-in inspection is passed and stamped as approved, you are cleared to proceed to insulation, drywall, and the remainder of the finish phase. For a full picture of how the rough-in inspection fits into the complete inspection sequence for a Spring TX bathroom remodel, read our guide on the inspection process after bathroom remodel permit approval in Spring TX.
It is important to note that in Spring TX, rough-in inspection may actually consist of two separate inspection visits — one for rough plumbing and one for rough electrical — depending on your project scope and the scheduling practices of your specific jurisdiction (Harris County vs. Montgomery County). Confirm with your permit documentation which inspection types are required and whether they can be combined or must be scheduled separately.
Plumbing Rough-In Preparation
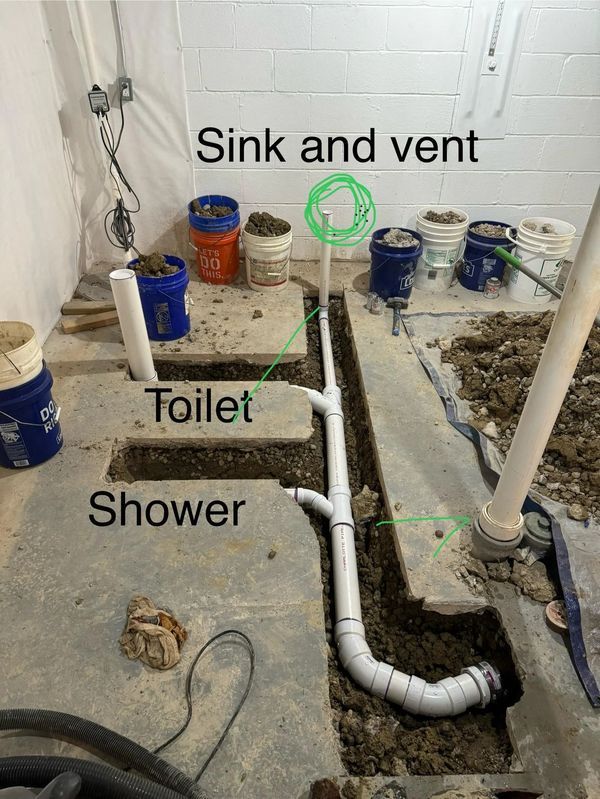
Plumbing violations are the single most common reason rough-in inspections fail in Spring TX bathroom remodels. Inspectors scrutinize drain slope, trap placement, vent configuration, pipe sizing, and cleanout access — and any one of these being off-spec is enough for a failed inspection and a correction notice.
What Must Be Fully Completed Before Calling Rough Plumbing Inspection
- All water supply lines — hot and cold — installed in final positions with approved fittings
- All drain lines installed with correct pipe sizing for each fixture type
- Drain lines sloped correctly throughout all horizontal runs
- Vent pipes fully installed and connected to the stack or approved vent system
- Shower and tub valves mounted in final position with required blocking in framing
- Toilet flange set at correct height relative to finished floor elevation
- Hydrostatic or air pressure test completed — supply lines must hold pressure without any leaks
- All unused line ends capped with approved fittings — no open pipes
- Pipes strapped and supported at correct intervals
- Nail plates installed wherever pipes pass through framing within 1-1/4 inch of stud face
Key Details Inspectors Focus On
Drain Slope: Horizontal drain lines must maintain a consistent minimum slope — 1/4 inch per foot for pipes 2.5 inches in diameter or smaller, 1/8 inch per foot for pipes 3 inches and larger. Inconsistent slope — including sections that sag or hump — will be flagged. For the full drain slope and pipe sizing requirements, see our guide on Spring TX plumbing code requirements for bathroom remodels.
Vent Connections: Every fixture must be properly vented to prevent sewer gas entry and ensure proper drainage. Inspectors verify correct vent sizing, tie-in points, and that all vents terminate appropriately at or above the roofline — not into the attic.
Shower Pan Liner: If installing a custom tiled shower, the liner or waterproof membrane must be fully installed with corners properly folded, no punctures from fasteners, and all surfaces correctly covered before calling inspection. The 24-hour flood test must also be complete — more detail on this in the Shower & Tub Preparation section below.
P-Trap Placement: Each fixture must have a correctly sized P-trap within code-specified arm length of the fixture drain outlet. No double-trapping, no S-traps, and no excessively long trap arms are permitted.
Hot and Cold Line Placement: Hot water supply must be on the left, cold on the right at all fixture connections. This simple but commonly missed detail is a consistent flagging point for inspectors reviewing DIY or rushed rough-in work.
Day-of Preparation for Plumbing Inspection
- Confirm water supply is turned on if the inspector needs to run a pressure check
- Verify all unused pipe ends are capped — no open lines
- Confirm all pipes are properly secured and strapped — no loose runs
- Clear debris from around all pipe work so inspector has clear line-of-sight
- Have the permit card and approved plans visible and accessible on-site

Electrical Rough-In Preparation
Bathroom electrical systems must meet strict NEC safety standards — and inspectors in Spring TX treat electrical violations seriously because bathroom wiring failures are a leading cause of residential fires and electrocution incidents. Proper preparation for the electrical rough-in inspection protects both your project timeline and your family's safety.
What Must Be Fully Completed Before Calling Rough Electrical Inspection
- All wiring runs installed in final positions — correct wire gauge for circuit amperage
- All electrical boxes secured in framing at correct mounting heights and depths
- Wire properly stapled to framing at required intervals — NEC specifies 12 inches from boxes and every 4.5 feet along runs for NM cable
- GFCI outlet locations set and wired correctly — required at all bathroom receptacle locations
- Exhaust fan wiring complete — switched and connected to the correct circuit
- Vanity lighting circuit wiring complete with box secured at correct height
- Any heated floor system wiring or thermostat rough-in complete if included in scope
- All junction boxes accessible — no buried boxes behind substrate
- Dedicated circuits installed where required by NEC (typically 20-amp for bathroom receptacles)
Key Details Inspectors Focus On
GFCI Protection: Ground Fault Circuit Interrupter protection is required for all receptacles within bathroom spaces. Inspectors verify correct wiring configuration, proper grounding, and that GFCI devices are in place before walls are closed. Missing or incorrectly wired GFCI protection is one of the most frequently issued correction notices in Spring TX bathroom rough-in inspections.
Box Fill Capacity: Every electrical box has a maximum fill capacity based on the number and size of conductors, devices, and fittings it contains. Overcrowded boxes — where too many wires are forced into an undersized box — are a safety hazard and a common inspection failure. Verify box fill calculations before inspection day.
Wire Protection from Framing: Where wires pass through or run along framing members within 1-1/4 inch of the face of the stud or joist, steel nail plates must be installed to prevent future penetration by drywall screws or finish nails. Missing nail plates are among the most consistently flagged items in Spring TX rough-in electrical inspections.
Dedicated Circuits: The NEC recommends a dedicated 20-amp circuit for bathroom receptacles. Some local amendments and inspector interpretations in Spring TX may require dedicated circuits — confirm requirements with your specific jurisdiction before rough-in is finalized.
Day-of Preparation for Electrical Inspection
- Confirm all wiring is complete — no partially run circuits
- Verify breaker panel is accessible with correct labeling for new circuits
- Leave all wire ends accessible and clearly identified at boxes
- Remove any temporary wiring used during construction phase
- Ensure all junction boxes have covers or are accessible per code
- Confirm all nail plates are installed at required framing penetration points
Framing & Structural Preparation
If any walls were moved, modified, or new structural framing was installed as part of your bathroom remodel, a framing inspection becomes a required step before walls can be closed. This inspection verifies that structural modifications are safe and match the approved permit plans — and in Spring TX, inspectors look closely for common DIY framing errors that compromise structural integrity.
What Inspectors Check During Framing Inspection
- Stud spacing — standard 16-inch on-center or 24-inch on-center depending on wall type and load
- Header installation over all door and window openings — correct header sizing for span and load
- Adequate structural support for any new openings cut into load-bearing walls
- Notching and drilling compliance — holes and notches in studs and joists must stay within code-specified size limits to preserve structural capacity
- Blocking installed at correct locations — towel bar blocking, grab bar blocking, shower door framing, and niche backing all require specific blocking in the framing stage
- Fire blocking installed at required locations — particularly in walls that penetrate between floors or at the top of stud cavities where required by code
- All framing modifications match the approved permit plans — deviations from approved plans require plan amendment before framing inspection can pass
Common Framing Inspection Failures
- Studs over-notched or over-drilled — weakening the structural member beyond code allowance
- Missing fire blocking at required locations
- Inadequate header support over new or modified door openings
- Structural modifications made without permit approval — requiring retroactive plan review
- Missing blocking for grab bars, towel bars, or shower fixtures specified in the plans
One area that frequently causes framing inspection issues in Spring TX bathroom remodels is grab bar blocking. If aging-in-place features are part of your remodel scope — or if you want the option to add them in the future — blocking for grab bars must be installed in the framing stage, before walls are closed.
Mechanical & Ventilation Requirements
Bathroom mechanical ventilation is one of the most commonly failed items in Spring TX rough-in inspections — and one of the most important for long-term home health. In Spring's humid subtropical climate, a bathroom exhaust system that does not properly move moisture to the exterior creates exactly the conditions that lead to mold growth, insulation damage, structural wood rot, and chronic odor problems.
What Must Be Completed Before Calling Mechanical Inspection
- Exhaust fan fully installed and secured in framing or ceiling structure
- Exhaust duct connected to fan housing with approved fittings
- Duct fully routed to exterior termination point — through roof or exterior wall cap
- All duct joints sealed with approved foil tape or mastic — not standard cloth duct tape
- Correct duct diameter maintained throughout the full run — no unapproved reducing fittings
- Termination cap installed at exterior with a functional backdraft damper
- Exhaust fan wiring connected to the switched circuit as required
Critical Ventilation Code Points
No Attic Venting: This is the single most common ventilation violation in Spring TX bathroom remodels. Exhaust fans must terminate to the building exterior — through an exterior wall or roof cap — never into the attic space. Venting into the attic deposits warm, humid air directly into the attic structure, causing mold, insulation compression, and wood rot. Inspectors check the full duct run and will flag attic termination every time.
Duct Sealing: Every joint in the exhaust duct run must be sealed with approved foil tape or mastic sealant. Unsealed joints allow moisture-laden air to escape into wall cavities and attic spaces rather than being carried to the exterior. Inspectors may check accessible joint points during the rough-in visit.
CFM Rating: The exhaust fan must have sufficient airflow capacity for the bathroom square footage. The HVI (Home Ventilating Institute) and IRC recommend a minimum of 1 CFM per square foot of bathroom area for bathrooms up to 100 square feet, or specific CFM ratings based on fixture count for larger bathrooms. Undersized fans may be flagged during inspection or final sign-off.
For additional guidance on how ventilation affects long-term material performance in Spring's climate, see choosing the right materials for humid Texas weather.
Shower & Tub Preparation
The shower pan and waterproofing inspection is one of the most critical — and most commonly failed — stages in a Spring TX bathroom remodel. This is the last opportunity to catch waterproofing defects before tile installation permanently conceals the liner or membrane. A failure at this stage after tile is already installed requires complete demolition of finished tile work and substrate, liner repair, and a full retest.
Custom Tiled Shower Preparation
- Shower floor pre-slope installed — minimum 1/4 inch per foot slope toward drain under the liner
- Liner or waterproof membrane fully installed with no punctures or fastener penetrations below the flood line
- All corners properly folded — improperly folded liner corners are a primary source of liner failures in the field
- Liner extends a minimum of 2 inches above the top of the shower curb on all sides
- Drain assembly properly installed with weep holes clear and compatible with liner type
- Shower curb properly constructed to required height and fully integrated into the liner
- Backer board or cement board installed on shower walls — standard drywall is not approved in wet zones
- Waterproofing membrane applied over backer board if using a membrane-only system (KERDI, RedGard, Hydro Ban, etc.) per manufacturer specifications
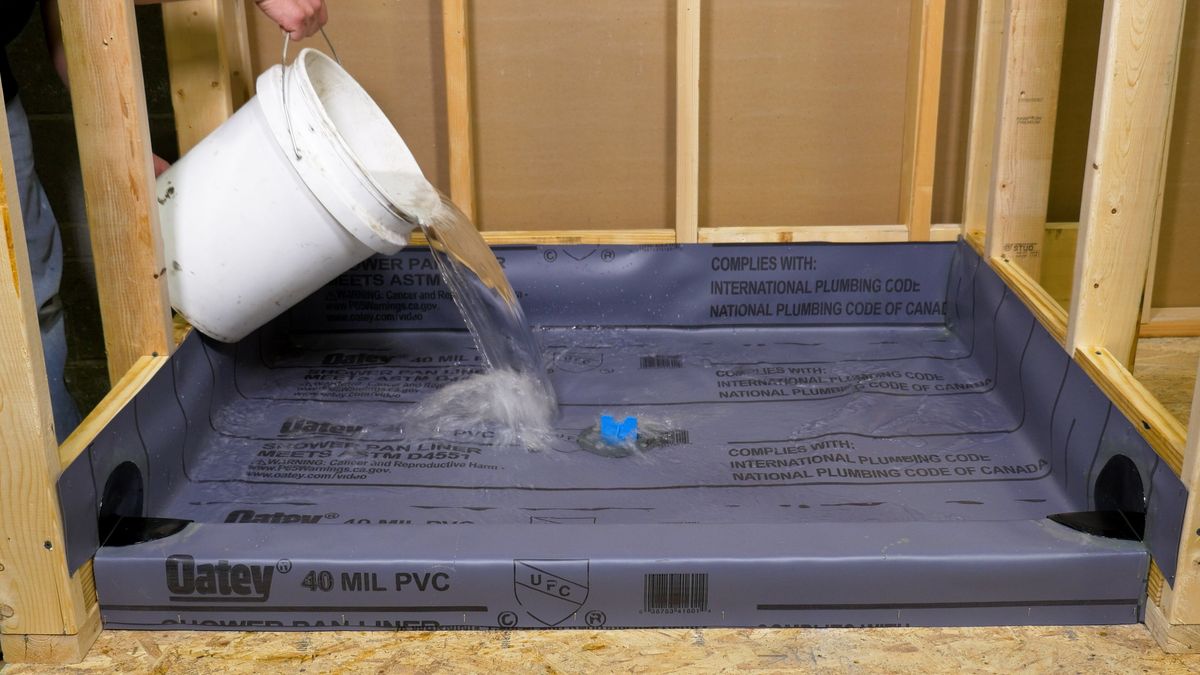
The 24-Hour Shower Pan Flood Test
The shower pan flood test is a mandatory inspection stage in Spring TX — not optional. It must be completed before the inspection is called, and the inspector verifies the result at the visit. No tile or substrate can be installed before this inspection passes.
How to perform the flood test correctly:
- Install an approved test plug in the drain, rated for the drain pipe diameter
- Fill the shower pan with water to a minimum of 2 inches above the highest point of the liner
- Mark the water level clearly on the curb or wall so any drop is visible
- Allow the water to sit completely undisturbed for a full 24 hours minimum
- Check the water level at 24 hours — any measurable drop indicates a liner leak
- Document the test with date/time photos before and after for the inspector
If the flood test shows any water level drop, the liner must be repaired or replaced before retesting. Do not attempt to tile over a liner that has not passed the flood test — this is one of the most expensive mistakes in bathroom construction. For the full waterproofing code requirements, see Spring TX plumbing code requirements for bathroom remodels.
Bathtub Preparation
- Tub properly supported underneath — mortar bed or approved blocking per manufacturer specs
- Drain assembly and overflow fitting fully secured with no leaks at connections
- P-trap installed correctly below the tub drain with approved fittings
- Anti-scald (thermostatic mixing) valve installed at the tub/shower valve — required by code
- Access panel provided in adjacent wall or floor for serviceability of drain connections where required
- Tub surround framing and blocking complete — no open framing against tub flange without proper backer
Documents to Have Ready
Documentation is a component of inspection readiness that is frequently overlooked until the inspector arrives. Having the right paperwork on-site and accessible prevents a situation where an inspector cannot proceed due to missing permit documentation — which results in a wasted visit and a rescheduling delay.
Documents to have available on-site before every inspection:
- Approved permit card — must be visibly posted at the jobsite; inspectors are required to see it before proceeding with any inspection
- Approved construction plans — the stamped and approved set that corresponds to the permit; inspectors reference these to verify work matches the approved scope
- Engineering documents — if structural changes were permitted and required engineering review, have those documents available for the framing inspection
- Manufacturer specifications for specialty fixtures — particularly for custom shower systems, waterproof membrane products, and specialty valves where installation method must match manufacturer specs to be code-compliant
- Shower pan flood test documentation — date and time of test start, photographs showing water level at start and at 24-hour mark, and confirmation of zero drop; some inspectors request this documentation in addition to visual inspection
- Previous inspection approval records — if this is not the first inspection on the permit, have documentation of prior approvals available
If a licensed contractor pulled your permit, they typically manage all permit documentation as part of their project coordination. If you pulled an owner-builder permit, maintaining an organized documentation file throughout the project is your responsibility. Keep physical copies on-site and digital backups accessible.
For guidance on the permit application process and what documentation is generated at each stage, read how to apply for a bathroom remodel permit in Spring TX.
Worksite Readiness Checklist
Beyond the technical work itself, the physical state of your jobsite on inspection day affects whether the inspector can safely and efficiently evaluate all required elements. A cluttered, obstructed, or poorly lit work area can result in an inspection that cannot be completed — which counts as a failed visit and requires rescheduling.
- Clear, safe walking paths — from the home entry through to the bathroom work area; remove tools, materials, and construction debris from all pathways
- Work areas clear of loose tools and materials — inspectors need unobstructed visual and physical access to all plumbing, electrical, and framing elements being inspected
- Adequate lighting — battery-powered or temporary lighting in the bathroom if permanent fixtures are not yet operational; inspectors need to clearly see all work
- Attic access provided if needed — if ventilation duct routing or framing modifications require attic verification, ensure the attic access hatch is clear and a ladder is available
- Utilities active as required — water supply on for plumbing pressure checks; electrical panel accessible for circuit verification
- Pets secured — dogs, cats, and other pets must be secured away from the inspection area for the duration of the visit
- Point of contact available — a knowledgeable person (contractor, homeowner, or designated representative) should be available on-site to answer inspector questions and provide access to all areas needed
Inspectors work within AM or PM scheduling windows — not specific appointment times. Keep the site ready and accessible for the full window on inspection day. Last-minute site preparation rushes are a common source of avoidable delays.
Common Rough-In Inspection Failures in Spring TX
Understanding the most frequently flagged rough-in inspection failures in Spring TX bathroom remodels helps you prioritize your pre-inspection review. These are not obscure code violations — they are recurring, preventable issues that experienced contractors eliminate through systematic preparation.
- Incorrect drain slope — the most common plumbing failure; lines less than 1/4 inch per foot on 2.5-inch or smaller pipes are consistently flagged
- Missing or improperly wired GFCI protection — outlets not GFCI-protected, GFCI devices wired in wrong load/line orientation, or missing grounding
- Improper venting — exhaust fans venting into attic instead of exterior; plumbing vent stack sizing or tie-in location errors
- Overcrowded electrical boxes — too many conductors in a box that exceeds its rated fill capacity
- Missing shower pan flood test — inspection called before the 24-hour test is complete, or the test was not performed at all
- Structural changes not matching approved plans — wall modifications, opening locations, or framing configurations that differ from the stamped permit plans
- Improper stud notching or drilling — holes or notches that exceed code limits and compromise structural capacity
- Missing nail plates — wires passing through framing within 1-1/4 inch of the stud face without steel nail plate protection
- Hot and cold supply lines reversed — hot on the right instead of the left at fixture connection points
- Walls closed before rough-in approval — the single most expensive failure; requires complete drywall and substrate removal for re-inspection
Inspection Timeline in Spring TX
Understanding the realistic timeline for rough-in inspection in Spring TX helps you plan your project schedule accurately and avoid idle days between construction phases.
Typical rough-in inspection timeline sequence:
- Rough-in work fully completed and verified internally
- Contractor or homeowner schedules inspection through county portal (24–48 hours advance notice required)
- Inspection appointment falls within 1 to 5 business days of scheduling request depending on current county workload
- Inspector arrives within scheduled AM or PM window
- Pass: Stamped approval issued → proceed immediately to insulation and drywall phase
- Fail: Correction notice issued → corrections completed → re-inspection scheduled (add 3–7 business days minimum per failed stage)
A single failed rough-in inspection easily adds 1 to 2 weeks to your overall project timeline when correction time and re-inspection scheduling lead time are combined. For high-investment bathroom remodels where contractor schedules, material lead times, and family disruption are all factors, this delay is costly on multiple levels.
Final Pre-Inspection Master Checklist
Use this checklist as your final walkthrough before calling any rough-in inspection for a Spring TX bathroom remodel. Every item checked off is one less reason for the inspector to issue a correction notice.
Plumbing
- All drain lines sloped correctly — 1/4" per foot minimum for lines ≤ 2.5"
- All vent connections complete and correctly sized
- P-traps properly placed — no double-trapping, no S-traps
- Hot supply left, cold supply right at all fixture connections
- Toilet flange at correct height for finished floor elevation
- All supply line ends capped — no open pipes
- Pipes strapped at correct intervals with approved hangers
- Nail plates installed at all framing penetrations within 1-1/4" of stud face
- Pressure test completed — zero leaks confirmed
- Shower pan flood test completed and documented (24-hour minimum)
Electrical
- All wiring runs complete with correct wire gauge
- All boxes secured at correct heights and depths
- Wire stapled at required intervals — 12" from boxes, 4.5 along runs
- GFCI outlet locations wired correctly at all bathroom receptacle positions
- Exhaust fan wiring connected to switched circuit
- Vanity lighting circuit wiring complete
- All nail plates installed at framing penetrations within 1-1/4" of stud face
- Box fill calculations verified — no overcrowded boxes
- Temporary construction wiring removed
- Breaker panel accessible with new circuits labeled
Framing
- All structural modifications match approved permit plans
- Headers properly sized and installed over all openings
- Stud notching and drilling within code limits
- Blocking installed — towel bars, grab bars, shower doors, niches
- Fire blocking present at required locations
Mechanical / Ventilation
- Exhaust fan installed and secured
- Duct fully routed to exterior — not into attic
- All duct joints sealed with foil tape or mastic
- Exterior termination cap installed with functional damper
- Correct duct diameter maintained throughout run
Shower & Tub
- Shower pre-slope installed under liner
- Liner fully installed — no punctures, corners correctly folded
- Liner extends minimum 2" above shower curb top
- 24-hour flood test completed — zero water level drop confirmed
- Flood test documented with photos
- Tub support, drain, and overflow secured
- Anti-scald valve installed at tub/shower valve
- Access panel planned for drain connections where required
Documentation & Site
- Permit card visibly posted on-site
- Approved plans available for inspector review
- Engineering documents on hand if structural work permitted
- Manufacturer specs available for specialty fixtures or membranes
- Flood test documentation prepared
- Clear walking paths throughout jobsite
- Adequate lighting in work area
- Attic access available if needed for ventilation verification
- Utilities active as required (water on, panel accessible)
- Knowledgeable point of contact available on-site during inspection window
Final Thoughts
The rough-in inspection is the most important checkpoint in your bathroom remodel. Once drywall goes up, every plumbing pipe, every wire run, every vent connection, and every structural modification becomes inaccessible — and mistakes become exponentially more expensive to correct. Proper preparation at this stage protects your timeline, your budget, and your investment.
If you are planning a bathroom remodel in Spring TX, preparing correctly at the rough-in stage can save you weeks of project delay and thousands of dollars in unexpected rework and re-inspection costs.
When you are ready to start your Spring TX bathroom remodel with a team that handles permits, plumbing coordination, rough-in preparation, and inspection management from day one, visit our bathroom remodeling services in Spring TX .
Choosing the right contractor matters. Reach out to Remodeling contractors The Woodlands & nearby areas like Spring, Conroe, Tomball, and Magnolia.